How to Froth Milk for Coffee: Tips and Techniques
Welcome to our blog on coffee! In this post, we will delve into the art of frothing milk for coffee. Whether you’re a barista or a coffee enthusiast, mastering the technique of frothing milk can take your coffee experience to a whole new level.
Did you know that frothed milk is not only visually appealing but also enhances the texture and flavor of your coffee? Whether it’s a creamy latte or a velvety cappuccino, frothed milk adds a delightful touch to your favorite caffeinated beverage. Join us as we explore tips and techniques to achieve that perfect froth every time!
Table of Contents
- How to Froth Milk for Coffee
- Frequently Asked Questions
- Q: Why is frothing milk important for coffee?
- Q: What tools do I need for frothing milk?
- Q: Can I froth milk without a milk frother?
- Q: How do I froth milk using a milk frother?
- Q: How do I froth milk without a milk frother?
- Q: What type of milk is best for frothing?
- Q: How do I achieve a latte art design with frothed milk?
How to Froth Milk for Coffee
Learn the art of frothing milk and elevate your coffee experience to a whole new level. In this guide, we’ll walk you through the best tips and techniques to achieve perfect milk froth every time. So grab your favorite mug, put on your barista hat, and let’s get started!
1. The Importance of Frothed Milk
Before we dive into the techniques, let’s talk about why frothed milk is such a game-changer for your coffee. Frothed milk adds a velvety texture and creamy flavor that enhances your coffee’s taste and presentation. Whether you prefer cappuccinos, lattes, or macchiatos, mastering the art of frothing will take your coffee creations to the next level.
2. Choosing the Right Milk
The type of milk you use plays a crucial role in achieving the perfect froth. Whole milk is the go-to option for its higher fat content, which creates a creamy and luxurious texture. If you’re looking for a dairy-free alternative, opt for almond milk or oat milk, which froth well and add a unique flavor dimension to your coffee.
3. Equipment and Tools
Having the right equipment can make all the difference in achieving a perfect milk froth. Here’s a list of essential tools you’ll need:
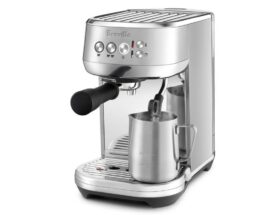
- A stainless steel milk frothing pitcher
- An espresso machine with a steam wand
- A thermometer to measure the milk temperature
Investing in quality equipment will not only make the frothing process easier but also ensure consistent results every time.
4. Frothing Techniques
Now that you have everything you need, it’s time to dive into the techniques. Follow these steps to achieve frothy milk like a pro:
- Start with cold milk: Cold milk froths better than warm milk, so make sure to use milk straight from the fridge.
- Pour the milk: Fill your frothing pitcher with the desired amount of milk, leaving some space for expansion.
- Position the steam wand: Submerge the steam wand into the milk, positioning it just below the surface.
- Purge the steam wand: Before turning on the steam, purge any condensation or water from the wand.
- Frothing process: Turn on the steam and position the wand slightly off-center. Gradually lower the pitcher as the milk expands, creating a whirlpool effect.
- Monitor the temperature: Use a thermometer to ensure the milk reaches around 150°F (65°C) for optimal froth.
- Tap and swirl: Once you reach the desired temperature, tap the pitcher on the countertop to eliminate any large bubbles. Give it a gentle swirl to create a smooth and creamy texture.
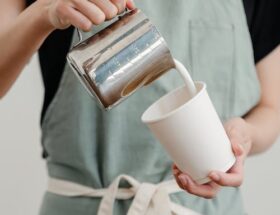
- Pour and enjoy: Pour your perfectly frothed milk into your coffee and savor the magic!
5. Practice Makes Perfect
Like any skill, mastering the art of frothing milk takes practice. Don’t be discouraged if your first attempts don’t yield the desired results. Experiment with different milk types, temperatures, and techniques until you find the perfect combination that suits your taste.
Remember, the key is to have fun and enjoy the process. With time and practice, you’ll become a frothing maestro and impress your friends and family with café-worthy beverages.
So keep those creative juices flowing and keep frothing!
Frequently Asked Questions
Q: Why is frothing milk important for coffee?
A: Frothing milk enhances the texture and taste of your coffee. It adds a velvety and creamy texture to your coffee beverages, making them more enjoyable.
Q: What tools do I need for frothing milk?
A: To froth milk, you will need a milk frother, a small pitcher or jug, and a thermometer (optional but recommended).
Q: Can I froth milk without a milk frother?
A: Yes, you can froth milk without a milk frother. You can use a handheld milk frother, a French press, or even a jar with a tight-fitting lid for frothing milk at home.
Q: How do I froth milk using a milk frother?
A: To froth milk using a milk frother, follow these steps:1. Heat the milk in a small pitcher or jug using the microwave or stovetop.2. Insert the frothing attachment or whisk of the milk frother into the milk.3. Activate the milk frother and froth the milk by moving the whisk up and down in a circular motion.4. Continue frothing until you achieve your desired level of foam.
Q: How do I froth milk without a milk frother?
A: If you don’t have a milk frother, you can still froth milk using alternative methods:1. Handheld milk frother: Heat the milk in a small pitcher, then immerse the frother whisk in the milk and froth by moving it up and down vigorously.2. French press: Heat the milk in a saucepan, transfer it to a French press, and vigorously pump the plunger up and down to create foam.3. Jar with a lid: Heat the milk in a saucepan, pour it into a jar with a tight-fitting lid, seal the jar, and shake vigorously for about 30 seconds to froth the milk.
Q: What type of milk is best for frothing?
A: Whole milk, 2% milk, and dairy alternatives like soy, almond, or oat milk can be frothed successfully. However, dairy milk tends to yield the best results due to its higher fat content.
Q: How do I achieve a latte art design with frothed milk?
A: To create latte art designs, froth the milk as usual using a milk frother or alternative method, then pour it slowly and steadily over your espresso in a controlled manner. Practice and experiment with different pouring techniques to create beautiful latte art designs.


