Philips Saeco Xelsis Milk Carafe Troubleshooting: Common Issues and Solutions
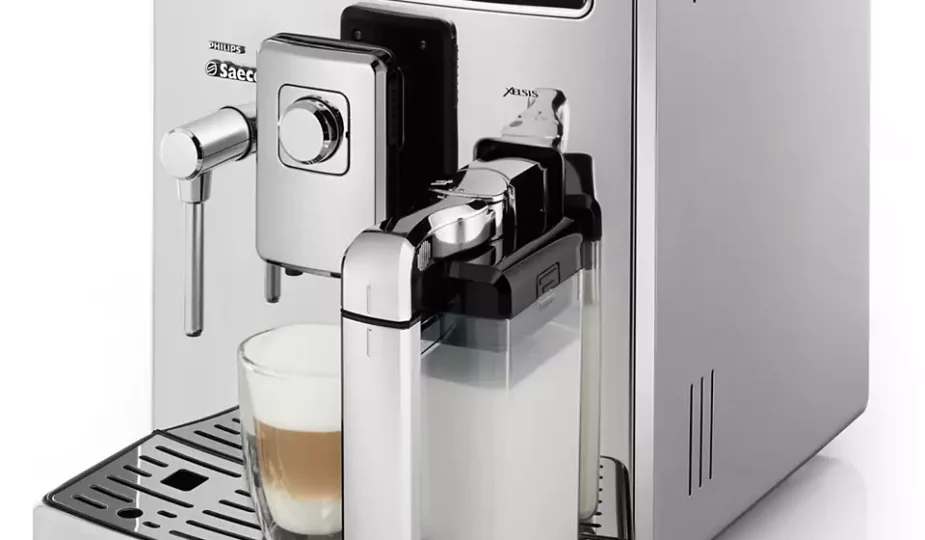
Are you a proud owner of the Philips Saeco Xelsis coffee machine? If you are, then you know that one of the standout features of this exceptional coffee machine is its built-in milk carafe. However, like any other device, the milk carafe may occasionally encounter some issues. From frothing problems to maintenance challenges, understanding the causes behind these issues and knowing how to resolve them can help you enjoy a perfect cup of frothy goodness every time.
Table of Contents
Common Issues with the Philips Saeco Xelsis Milk Carafe
Issue 1: Milk Frother Not Working or Producing Inconsistent Froth
If your Philips Saeco Xelsis milk carafe is not producing frothy milk or is inconsistent in its froth quality, there are a few troubleshooting steps you can follow:
- Check the milk carafe’s positioning: Ensure that the milk carafe is placed correctly in the machine and securely locked in place.
- Proper milk temperature: Make sure the milk you’re using is cold and at the correct temperature, as warm or hot milk can affect froth production.
- Clean the milk carafe and frother: Regularly clean the milk carafe and frother components to remove any milk residue or clogs that might be affecting the frothing process.
- Inspect the frothing tube: Check if the frothing tube is properly attached and not damaged. If necessary, replace the frothing tube.
Issue 2: Milk Carafe Not Dispensing Milk
If your milk carafe is not dispensing milk, there could be a few reasons behind this issue:
- Check for milk blockage: Inspect the milk carafe and tube for any blockages or clogs. Clean the components thoroughly to ensure smooth milk flow.
- Verify milk carafe connection: Ensure that the milk carafe is correctly connected to the coffee machine, and the milk outlet is properly aligned with the milk pipe.
- Monitor milk level sensor: The milk carafe may not dispense milk if the milk level sensor is not functioning correctly. Contact customer support for assistance with sensor-related issues.
Issue 3: Leakages or Dripping from the Milk Carafe
If you notice leakages or dripping from your Philips Saeco Xelsis milk carafe, follow these steps:
- Check for proper assembly: Ensure that all parts of the milk carafe, including the lid, are firmly and correctly assembled.
- Inspect the O-ring: Check the O-ring seal located in the milk carafe lid. If it’s damaged or worn out, replace it to prevent leaking.
- Clean and maintain the carafe: Regularly clean the milk carafe and its components to prevent residue build-up that can lead to leaks.
Maintenance Tips for Optimal Milk Carafe Performance
To keep your Philips Saeco Xelsis milk carafe in optimal condition and prevent future issues, consider the following maintenance tips:
- Regular cleaning: Clean the milk carafe thoroughly after each use to remove any milk residue. Use warm soapy water and rinse thoroughly.
- Descale when necessary: The machine might require descaling periodically to remove mineral build-up, which could affect the milk carafe’s performance.
- Replace worn-out parts: If you notice any damaged or worn-out components in the milk carafe, such as the O-ring or frothing tube, replace them promptly to maintain functionality.
By following these troubleshooting steps and maintenance tips, you can overcome common issues with the Philips Saeco Xelsis milk carafe and enjoy frothy milk beverages consistently. Remember to refer to the user manual or contact customer support for detailed instructions specific to your machine.
Did you know that the milk frother's performance can be affected by residue buildup? Over time, milk proteins and fats can accumulate inside the milk frother's components, leading to reduced frothing efficiency. To address this issue, it's recommended to regularly clean and maintain the milk frother. After each use, make sure to disassemble the frother according to the manufacturer's instructions and rinse all parts thoroughly with warm water.
Step by Step Guide to Philips Saeco Xelsis Milk Carafe Troubleshooting
1. Identifying the Problem
Before jumping into any troubleshooting steps, it is important to accurately identify the issue you are experiencing with your Philips Saeco Xelsis milk carafe. Here are some common problems you may encounter:
- No milk froth
- Milk froth too thin
- Milk not dispensing at all
- Carafe not properly connecting
- Leaking milk carafe
2. Cleaning the Milk Carafe
Regular maintenance and cleaning of the milk carafe can help prevent various issues. Follow these steps:
- Detach the milk carafe from the machine and remove any remaining milk.
- Take apart the milk carafe by unscrewing the top lid and separating the components.
- Wash all parts with warm soapy water, ensuring to clean all milk residue thoroughly.
- Rinse the components with clean water and let them air dry completely before reassembling.
- Make sure to clean the milk carafe at least once a week or as recommended by the manufacturer.
3. Checking the Milk Frother Tube
The milk frother tube may sometimes get clogged or blocked, affecting the frothing process. Here’s how to check and clean it:
- Remove the milk frother tube from the carafe lid by twisting it counterclockwise.
- Inspect the tube for any signs of blockage like dried milk or debris.
- Clean the tube using warm water and a small brush or pipe cleaner.
- Rinse the tube thoroughly to ensure it is free from any residue.
- Reattach the milk frother tube to the carafe lid, making sure it sits securely.
4. Adjusting Milk Froth Thickness
If you find that the milk froth is either too thick or too thin for your liking, you can adjust it using the settings on your Xelsis coffee machine:
- Press the menu button on the machine and navigate to the “Milk Menu”.
- Select “Froth” or “Foam” to adjust the thickness according to your preference.
- Experiment with different settings until you achieve your desired milk froth consistency.
- Remember to test the milk froth with a few trial runs to ensure it meets your expectations.
5. Seeking Professional Assistance
If you have followed the steps above and are still experiencing issues with your Philips Saeco Xelsis milk carafe, it may be time to seek professional help. Contact the manufacturer’s customer support or a certified service center for further assistance or to schedule a repair.
Complete Guide to Descaling Your Philips Saeco Xelsis
Why Descaling Matters
Limescale buildup is one of the most common issues affecting your machine’s performance. Regular descaling:
- Extends machine lifespan
- Maintains optimal coffee temperature
- Ensures consistent milk frothing
- Prevents water flow issues
- Preserves coffee flavor quality
When to Descale
Your Xelsis will alert you when descaling is needed, but here are some signs to watch for:
- Slower coffee brewing
- Reduced steam output
- Inconsistent milk frothing
- Lower coffee temperature
- Strange noises during brewing
Important Descaling Guidelines
Before starting the descaling process:
- Use only Philips descaler (CA6700)
- Never use vinegar or other acidic descalers
- Remove the AquaClean filter before descaling
- Complete the entire process without interruption
- Plan for about 15 minutes of machine downtime
Step-by-Step Descaling Process
Preparation
- Empty and clean the drip tray and coffee grounds container
- Remove the AquaClean filter from the water tank
- Empty the water tank completely
- Have a large container (1.5L minimum) ready
Descaling Procedure
- Pour the entire bottle of Philips descaler into the water tank
- Fill with fresh water up to the CALC CLEAN level
- Place a large container under the coffee and milk dispensing spouts
- Start the descaling process:
- Either press start when prompted by the machine
- Or manually select Clean → Descale from the menu
- Follow the on-screen instructions carefully
- The process takes approximately 15 minutes
- Complete both the descaling and rinsing cycles
After Descaling
- Install a new AquaClean filter
- Activate the filter in the menu
- Run a manual rinse cycle
- Clean the milk system thoroughly
If Descaling is Interrupted
If the process stops midway:
- Empty and rinse the water tank thoroughly
- Fill with fresh water to the CALC CLEAN mark
- Power the machine back on
- It will automatically heat and rinse
- Perform a manual rinse cycle:
- Dispense half a tank of hot water
- Brew 2 cups without coffee grounds
Pro Tips for Descaling Success
- Mark your calendar for regular descaling every 3 months
- Keep spare descaling solution on hand
- Never skip the rinsing cycle
- Always complete the full process once started
- Use the AquaClean filter to reduce descaling frequency
- Follow up with a milk system clean for best results
Maintenance Products Needed
- Philips Descaling Solution (CA6700)
- AquaClean Filter (CA6903) for post-descaling
- Milk Circuit Cleaner (CA6705) for follow-up cleaning
Remember: Using non-Philips descaling products can damage your machine and void the warranty. Always keep genuine Philips descaler on hand for when your machine indicates it needs descaling.
Advanced Technical Solutions for Milk System Issues
Internal Cappuccinatore Alignment
One of the most overlooked issues with milk frothing is proper cappuccinatore alignment. For optimal performance:
- Ensure the holes in the cappuccinatore are perfectly aligned with the tubes in the machine
- Push the internal cappuccinatore upwards until it locks into place
- Verify the spout door is completely closed
- Check that the flexible milk tube is fully connected to the cappuccinatore
Temperature-Related Problems
If you’re experiencing inconsistent milk frothing:
- Use cold milk directly from the refrigerator (this is crucial for optimal results)
- Different milk types produce varying results:
- Best results: Semi-skimmed or full-fat cow’s milk
- Good alternatives: Soy milk and lactose-free milk
- Each type requires different temperature conditions
Deep Cleaning Protocol
For persistent milk system issues, follow this professional cleaning sequence:
- Use Philips milk circuit cleaner (CA6705)
- Activate the DEEP MILK CLEAN procedure through the cleaning menu
- Run the HygieSteam program daily:
- Press ‘Clean’ on the control panel
- Select ‘HygieSteam’
- Follow the on-screen prompts
- Disassemble and clean components under tap water
Storage Best Practices
To prevent milk tube clogging:
- Never store the milk container with tubes attached
- Clean tubes thoroughly before storage
- Rinse the system after each use
- Store milk container separately in the refrigerator
Error Prevention
Common error indicators and solutions:
- E05: Air in water circuit – Restart and dispense 2-3 cups of hot water
- E01: Clogged coffee funnel – Clean thoroughly
- E03: Dirty brew group – Clean and lubricate
- E04: Incorrect positioning – Reset brew group position
Wrap Up
In this blog post, we have explored common issues with the Philips Saeco Xelsis milk carafe and provided step-by-step solutions to troubleshoot and fix these problems. We have discussed the main causes behind these issues, such as clogged milk frothers or incorrect milk carafe maintenance. By following the tips and techniques mentioned, you can keep your milk carafe in optimal condition and prevent future issues.
We hope that this guide has been helpful in resolving any milk carafe troubles you may have encountered with your Philips Saeco Xelsis coffee machine. If you have any questions or additional tips to share, please leave a comment below. We would love to hear from you!
For more informative articles about coffee, brewing techniques, and coffee machine repair, please visit our website:
- How to Make Vietnamese Coffee: The Strong & Bold Coffee
- How to Hario V60: The Ultimate Guide to Making Perfect Coffee
- How to Siphon Coffee: The Slow and Elegant Way to Brew a Perfect Cup
- How to Aeropress: The Ultimate Guide to Making Amazing Coffee at Home
- How to Turkish Coffee: An Invigorating Coffee Experience
Remember, the perfect cup of coffee is just a troubleshooting step away!


