How to Make a Mocha at Home: Easy Espresso and Chocolate Recipe
Let’s be honest: you don’t need a barista with a curated mustache and a $12,000 machine to make a mocha that makes your eyes roll back. You need a shot of good espresso, some real chocolate, a little hot milk, and about four minutes. That’s it. The mocha is the friendliest member of the coffee family – it’s a latte that decided to have dessert for breakfast, and frankly, good for it.
So before you fork over six bucks (plus tip, plus parking, plus the existential dread of the drive-through line), let me walk you through making a cafe-quality mocha in your own kitchen. We’re going to talk ratios, temperatures, the chocolate that actually melts well, and the tiny mistakes that turn a dreamy mocha into a grainy sad puddle. Grab your favorite mug. This is the good stuff.
Table of Contents
- Brewing up the Perfect Mocha at Home
- Tips and Recommendations
- Frequently Asked Questions
- 1. How do I make a mocha at home?
- 2. Can I use instant coffee instead of espresso?
- 3. What types of chocolate work best for making a mocha?
- 4. Are there any alternatives to cow’s milk for a mocha?
- 5. How can I make my mocha less sweet?
- 6. Can I add other flavors to my mocha?
- 7. Can I make a mocha without an espresso machine or moka pot?
- 8. What is the difference between a mocha and a latte?
- One Last Sip
Brewing up the Perfect Mocha at Home
A mocha is built on three pillars: a punchy espresso, melted chocolate (not just a sad squirt of syrup, unless that’s your vibe – no judgment), and silky steamed milk. Get those three right and the rest is decoration. Here’s the classic ratio I reach for, and you can adjust it like a control freak once you know it:
- 1 to 2 shots of espresso (about 1 to 2 oz / 30 to 60 ml)
- 1.5 to 2 tablespoons of chocolate (dark chocolate or a good chocolate sauce)
- 6 to 8 oz (180 to 240 ml) of steamed milk, depending on how big your mug and your appetite are
- A crown of whipped cream if you’re feeling celebratory (you should be)
That gives you a roughly 1:1 espresso-to-chocolate balance with the milk doing the smoothing. If your mocha tastes like a melted candy bar, pull back the chocolate. If it tastes like a sad latte that heard about chocolate once, add more. You’re the boss here.
Discover the Magic of a Homemade Mocha
Here’s the thing nobody tells you: the magic of a homemade mocha isn’t some secret technique. It’s that you get to control everything. Coffee shop mochas are often a sugar bomb engineered to be crave-able, which is great for them and rough on your taste buds and your wallet. At home, you decide how dark the chocolate is, how sweet the cup gets, and whether your milk is dairy, oat, or almond. You can make it 70% dark and barely sweet for a grown-up afternoon sip, or loaded with whipped cream and shavings for a Friday-night treat. From brewing the perfect espresso shot to folding in rich, velvety chocolate, every lever is yours to pull. Let’s get into it.
Step 1: Gather Your Ingredients
Before you go full barista, get everything within arm’s reach. Espresso waits for no one – it tastes best the moment it’s pulled, so you don’t want to be hunting for the cocoa powder while your shot goes flat and bitter. Here’s your shopping list:
- Freshly roasted coffee beans. Whole bean, ideally roasted within the last few weeks. Choosing the right ones matters – see how to go about selecting the perfect coffee beans.
- A quality espresso machine or a coffee maker with an espresso setting. No machine? I’ve got workarounds for you further down.
- High-quality dark chocolate or cocoa powder. Aim for 60 to 70% cacao if you want that classic mocha depth.
- Sugar or sweetener of your choice – simple syrup blends in more smoothly than granulated.
- Milk – dairy or non-dairy. Whole milk froths like a dream; barista-blend oat milk is the best plant-based performer.
- Whipped cream (technically optional, spiritually mandatory).
- Optional flair: cocoa powder, chocolate shavings, a tiny pinch of flaky salt.
Step 2: Brew the Perfect Espresso Shot
The foundation of any good mocha is a well-pulled espresso shot. Chocolate and milk will hide a lot of sins, but they can’t resurrect a watery, sour shot – so let’s do this right.
If you’ve got an espresso machine, grind your coffee beans to a fine, powdery-but-not-flour consistency right before brewing. Dose around 18 to 20 grams for a double shot, tamp evenly with firm pressure, and aim to pull about 36 grams of liquid espresso in 25 to 30 seconds. Your water should be roughly 195 to 205°F (90 to 96°C). A shot that gushes out in 15 seconds will taste sour and thin; one that drips out over 40 seconds will taste burnt and bitter. Adjust your grind finer to slow it down, coarser to speed it up.
No espresso machine? Don’t panic. Many coffee makers now ship with an espresso setting that gets you respectably close. The mocha is famously forgiving, which is exactly why it’s the perfect drink to start with.
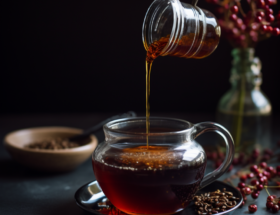
Step 3: Melt the Chocolate
While your espresso brews, deal with the chocolate. You’ve got two roads here, and both lead somewhere delicious.
Option A – real chocolate: Break 1.5 to 2 tablespoons of dark chocolate into small pieces and melt gently. Microwave in 15-second bursts, stirring between each, or use a double boiler. The cardinal rule: low and slow. Chocolate scorches fast and seizes into a grainy mess the second it gets too hot, so don’t blast it on high and walk away.
Option B – cocoa powder: Whisk 1 to 2 tablespoons of unsweetened cocoa powder with an equal amount of sugar and a splash of hot water until you’ve got a smooth, glossy chocolate syrup with no dry lumps. This is the faster route and it dissolves beautifully into hot espresso.
Step 4: Combine the Espresso and Chocolate
Now bring them together while both are hot – this is the moment that makes or breaks your mocha. Pour your fresh espresso shot straight over the melted chocolate or cocoa syrup and stir, stir, stir until the mixture is completely uniform and glossy. Heat plus stirring equals a smooth base; cold chocolate plus hot espresso equals little chocolate clumps bobbing around like tiny regrets. Taste it now – this is your last easy chance to nudge the sweetness or chocolate intensity before the milk goes in.
Step 5: Sweeten and Froth the Milk
No mocha is complete without a silky, frothy layer of milk. Pour 6 to 8 oz of milk into a steaming pitcher, adding sugar or sweetener now if you want it. If you’ve got a steam wand, keep the tip just below the surface to introduce air for the first few seconds (that hiss is the foam forming), then submerge it slightly to spin the milk into a glossy whirlpool. You’re aiming for about 140 to 150°F (60 to 65°C) – hot enough to feel the pitcher get uncomfortable to hold, but never boiling, because scalded milk tastes flat and loses its sweetness.
No steam wand? Heat the milk in a saucepan until steaming (not boiling) and froth it with a handheld milk frother, a French press (pump the plunger 20 to 30 times), or a clean jar you shake like you mean it and then microwave for 30 seconds to set the foam.
Step 6: Assemble and Serve
Here’s the fun part. Pour the frothy milk over your espresso-and-chocolate base, holding back the foam with a spoon and then spooning it on top. Feeling fancy? Try a little latte art – even a wobbly heart counts. Crown it with a dollop of whipped cream, dust with cocoa powder or chocolate shavings, and add that tiny pinch of salt if you’re chasing the deluxe version. Then sit down, ignore your inbox, and drink it while it’s hot.
Congratulations – you’re officially your own barista now. Play with the variations, find your personal ratio, and you’ll never have to crave a cafe mocha again.
Why These Small Details Actually Matter
If you’re wondering why I keep harping on temperatures and ratios, here’s the payoff. The little things are the entire difference between “wow” and “meh”:
- Freshness wins. Beans go stale fast once ground. Grinding right before you brew is the single biggest upgrade most home setups are missing – it keeps the aromatic oils alive and your shot tasting bright instead of cardboard-flat.
- Heat is a tool, not a setting. Milk frothed to 140 to 150°F tastes naturally sweeter because the lactose breaks down just enough. Push past 160°F and you cook out that sweetness and pick up a scalded, papery note.
- Chocolate quality is non-negotiable. A 60 to 70% dark chocolate brings actual cocoa complexity; a waxy candy coating just brings sugar. Your mocha can only taste as good as the chocolate you put in it.
- Balance beats sweetness. A tiny pinch of salt doesn’t make your mocha salty – it tames bitterness and makes the chocolate read as more chocolatey. It’s the oldest trick in the dessert book for a reason.
- Order of operations matters. Melt chocolate first, combine with hot espresso second, add milk last. Do it out of order and you fight clumps the whole way.
Now that you know why each step earns its place, let’s lock in the technique. Here’s a quick visual walkthrough if you’re more of a watch-then-do person:
Tips and Recommendations
- Invest in a decent espresso machine or espresso maker – it’s the heart of the whole operation and pays for itself in skipped coffee runs.
- Use freshly roasted coffee beans for a rich, full-bodied mocha that actually tastes like something.
- Grind your beans right before brewing to keep the freshness and aroma locked in.
- Experiment with different chocolates – milk, semisweet, 70% dark – until you find your sweet spot (literally).
- Add a pinch of salt to deepen the chocolate flavor and balance the sweetness. Trust me on this one.
- Stir the espresso and chocolate together while both are hot so everything melts into a smooth base instead of clumping.
- For an extra-indulgent version, top with whipped cream and chocolate shavings.
- Sip slowly. A mocha is a moment, not a task – savor that coffee-and-chocolate combo.
- Customize with caramel, vanilla, peppermint, or a dusting of cinnamon to make it unmistakably yours.
- Keep notes on your ratios so you can recreate the perfect cup once you nail it – and don’t be afraid to keep tweaking.
Frequently Asked Questions
1. How do I make a mocha at home?
Quick version, start to finish:
- Brew a strong shot of espresso (or a very strong cup of coffee using an espresso machine, moka pot, or coffee maker with an espresso setting).
- Melt 1.5 to 2 tablespoons of dark chocolate, or whisk cocoa powder with sugar and a splash of hot water into a syrup.
- Pour the hot espresso over the chocolate and stir until smooth and glossy.
- Heat and froth 6 to 8 oz of milk to about 140 to 150°F – hot but not boiling.
- Pour the frothy milk over the espresso-chocolate base and stir gently to combine.
- Top with whipped cream and a dusting of cocoa or chocolate shavings if you like.
- Enjoy your homemade mocha while it’s hot!
2. Can I use instant coffee instead of espresso?
You can, in a pinch. Instant coffee won’t give you the same bold, syrupy depth or that signature crema, but if you make it extra strong (use a heaping spoonful and less water), it’ll get you a perfectly drinkable mocha. For the real-deal experience, though, a freshly pulled espresso shot is worth the effort.
3. What types of chocolate work best for making a mocha?
High-quality dark chocolate (around 60 to 70% cacao) or a good chocolate syrup are your best bets – they bring richness and that distinctive cocoa depth without being cloying. Semisweet chocolate chips work nicely too. Milk chocolate makes a sweeter, mellower cup, while anything above 80% dark gives you an intense, barely-sweet mocha. Play around and find your line.
4. Are there any alternatives to cow’s milk for a mocha?
Absolutely. Almond, soy, oat, and coconut milk all work beautifully and each brings its own personality – oat milk is the creamiest and froths closest to dairy, while coconut adds a subtle tropical note. Just reach for a “barista” blend when you can, since those are formulated to heat and froth without splitting.
5. How can I make my mocha less sweet?
Easy fixes: cut back the chocolate or syrup, and switch to a higher-cacao dark chocolate (70% and up) so you get deep chocolate flavor with far less sugar. Skip any added sweetener entirely and let the chocolate do the talking. An extra shot of espresso also balances out sweetness by adding bitterness and body.
6. Can I add other flavors to my mocha?
Please do. A few drops of vanilla or peppermint extract, a swirl of caramel, or a pinch of cinnamon or nutmeg can transform your mocha into a whole new drink. Go easy though – you want the coffee and chocolate to stay the stars, with the extra flavor playing a supporting role.
7. Can I make a mocha without an espresso machine or moka pot?
Yes. If you don’t have an espresso machine or moka pot, brew a very strong cup of coffee with a French press or drip maker – just use more grounds and less water than usual. It won’t be as concentrated as true espresso, so dial back the milk a touch to keep the coffee flavor front and center. Still delicious, promise.
8. What is the difference between a mocha and a latte?
Chocolate. That’s the whole secret. A latte is espresso plus steamed milk and a thin layer of foam. A mocha is that same latte with chocolate stirred in – so think of a mocha as a latte that went to dessert school. If you ever want to fix a flat, watery cup of either, this guide on brewing techniques will sort you out.
One Last Sip
Making a mocha at home isn’t a project – it’s a four-minute ritual that saves you money and tastes better than the drive-through, because you control every variable. Quality beans, real chocolate, properly frothed milk, and the right order of operations: nail those and you’ve got a cafe-grade mocha in your hands whenever the craving hits.
So make one this weekend. Tweak the ratio, try a square of fancy dark chocolate, throw in a drop of peppermint in December. Once you realize how good a homemade mocha can be, the coffee shop becomes the backup plan, not the default.
Thanks for hanging out at Ten Coffees, your guide to coffee brewing techniques and recipes. Got a mocha trick of your own or a question about your setup? Drop a comment below – I read them all. Now go froth something. Happy brewing!