How to Tamp Espresso the Right Way
You bought the machine. You dialed in the grind. You weighed your beans like a pharmacist counting out something illegal. And then your shot gushed out in nine seconds, pale and sour, tasting like sad water that once met a coffee bean at a party. Friend, I have news, and it is mostly good news: the problem is probably your tamp.
Tamping is the most underrated 10 seconds in your entire espresso routine, and it’s also the part people obsess over for all the wrong reasons. By the time we’re done here, you’ll know exactly how hard to press (less than you think), why leveling matters more than muscle, how to spot the dreaded channeling before it ruins your morning, and which little tools quietly do the work for you. Let’s fix that shot.
What Tamping Actually Does (and Why It Matters)
Here’s the whole game in one sentence: tamping compresses your loose coffee grounds into a firm, even puck so that water is forced to move through all of it at the same speed.
Espresso is brewed under roughly 9 bars of pressure, which is about 130 psi of hot water absolutely determined to take the path of least resistance. If your puck has a loose, fluffy spot, the water bolts straight through it like a toddler spotting an open gate. That spot over-extracts, the rest of the puck barely gets wet, and you end up with a shot that’s somehow bitter and weak at the same time. That escape route has a name, and we’ll get to it.
A good tamp removes the air pockets, evens out the density, and gives the water one fair, uniform bed to flow through. That’s it. It’s not about strength. It’s about consistency. If you want the bigger picture of where tamping fits, our ultimate guide to making espresso at home walks the whole shot start to finish.
The Great 30 lb Myth (Yes, It’s Mostly a Myth)
If you’ve read literally anything about espresso, someone has barked “30 pounds of pressure!” at you. Baristas have been straining their wrists over this magic number for decades. Here’s the wink: the exact number barely matters.
Coffee grounds only compress so far. Once you’ve pressed hard enough to bring the particles into firm contact and squeeze out the air, pushing harder does almost nothing. You hit a wall called the lock-out point, and after that you’re just bullying the puck for no reward. Tasting experiments comparing a comfortable tamp to a heavy, white-knuckle tamp have shown only a tiny difference in the cup. We’re talking a rounding error, not a revolution.
So here’s the honest, useful version:
- Anywhere from about 15 to 30 pounds of force works fine. That’s roughly the pressure you’d use to push down on a bathroom scale until it reads in that range. Try it once on a scale so your arm learns the feeling.
- Consistency beats intensity. Whatever pressure you pick, repeat it every single time. A repeatable 20 lb tamp will make better coffee than a heroic-but-random 40 lb mash.
- Level beats heavy. Every time. A perfectly flat, gentle tamp outperforms a crooked, powerful one. Always.
Put the 30 lb commandment down. Your wrists will thank you, and your espresso won’t know the difference.
Distribute First, Tamp Second
This is the step everyone skips, and it’s the one that actually matters. Here’s the brutal truth: a perfectly level tamp pressed on top of clumpy, lopsided grounds still gives you a lopsided puck. You can’t press your way out of bad distribution. The tamp just freezes the mess in place.
When coffee comes out of the grinder it tends to clump and pile unevenly, especially with finer espresso grinds. Your job is to spread it flat and break up the clumps before the tamper ever touches it. A few ways to do it:
- The tap-and-settle: Gently tap the side of the portafilter a couple of times to let the bed settle level, then one light tap straight down on your mat.
- The finger sweep (NSEW): Use a finger to drag grounds across the basket north, south, east, and west until the surface looks even.
- A distribution tool: A spinning leveler (sometimes called an OCD tool) rakes the grounds flat with zero guesswork. We’ll cover these in the tools section.
And remember, distribution can’t fix a bad grind. If your grounds are full of boulders and dust, no amount of leveling saves you. A quality burr grinder is the real hero here, so if yours is struggling, see our picks for the best coffee grinder.
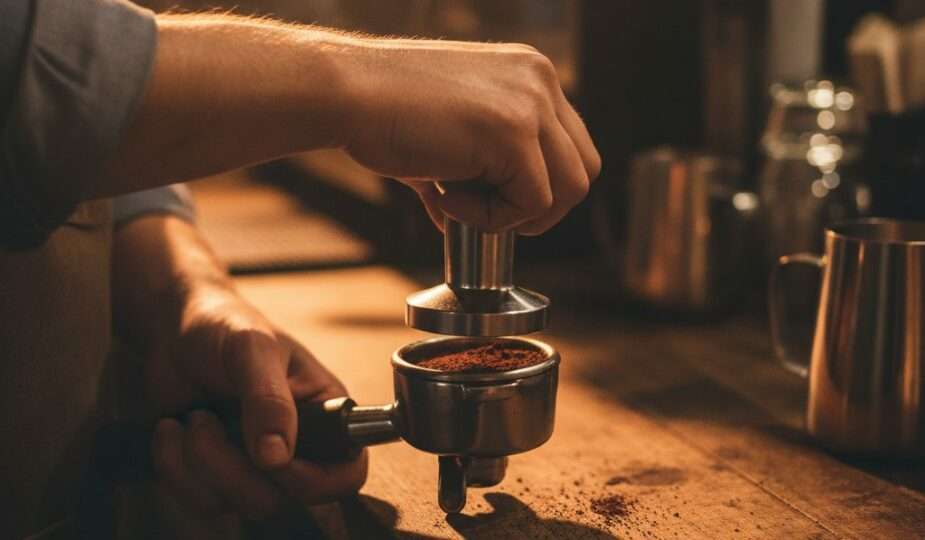
How to Tamp Espresso: Step by Step
Now the main event. Set the portafilter on a tamping mat or a sturdy edge so it doesn’t wobble, and follow along.
- Distribute and level your grounds first. See above. Don’t you dare skip it.
- Grip the tamper like a doorknob. Palm on top, fingers wrapped around the base. This grip naturally keeps your wrist straight and your pressure even.
- Line up your elbow. Get your forearm vertical, elbow stacked directly over the portafilter at roughly 90 degrees. Straight-down force is the goal.
- Press straight down, smoothly. Lean in with your upper body rather than just cranking your wrist. Push until you feel firm resistance, the puck pushing back. That resistance is your signal, not a number on a scale.
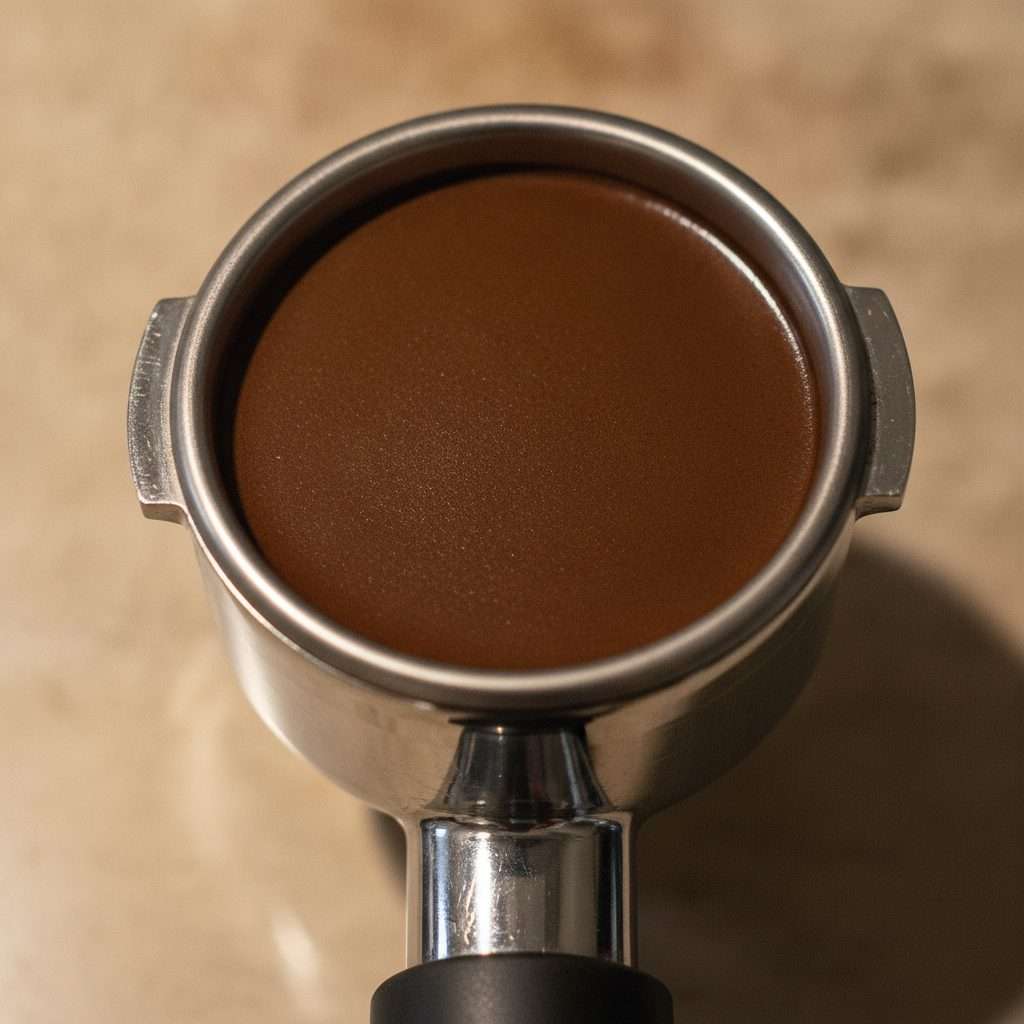
- Check the level. Look at the puck from the side. It should be flat as a tabletop. A tilted surface means a tilted puck.
- Lift straight up. Don’t twist as you pull away. (The old “polish” twist is a leftover habit that does nothing useful and can crack the surface.) A gentle lift is all you need.
The whole thing takes about ten seconds once it’s muscle memory. Pair it with a good shot ratio (a classic is 1:2, so 18 grams of coffee yielding 36 grams of espresso in 25 to 30 seconds) and you’re genuinely in business. A good coffee scale makes those numbers trivial to nail.
Mind the Angle (This Is Where Shots Die)
If you take one thing from this article, take this: a tilted tamp is the number one cause of bad espresso among people who are otherwise doing everything right.
When your tamper goes in at even a slight angle, one side of the puck ends up denser than the other. The looser side becomes a superhighway. Under 9 bars of pressure, water finds that weak side and drills straight through it, leaving the rest of your coffee barely touched. Flat is not a suggestion here. Flat is the whole point.
Channeling: The Villain of This Story
Channeling is what we call it when water carves a fast path through one part of the puck and races through, leaving the rest dry-ish and under-extracted. It’s the direct result of the sins above: uneven distribution, an angled tamp, or clumpy grounds.
How to spot it:
- Jets or sprays shooting out of the bottom of a naked (bottomless) portafilter instead of a calm, even stream.
- A shot that runs blonde fast, turning pale way too early.
- Sour, thin, watery taste even though your dose and grind look right on paper.
- A spent puck with a hole or crater bored into the surface when you knock it out.
The fix is almost never “tamp harder.” It’s distribute better, level your tamp, and check your grind consistency. Nine times out of ten, channeling is a prep problem, not a pressure problem.
Common Tamping Mistakes to Quit Today
- Tamping crooked. The big one. Keep it flat.
- Skipping distribution. Pressing clumps flat just gives you a flat clump.
- Going full gorilla. Past the lock-out point you’re wasting energy and risking wrist strain for zero flavor gain.
- Inconsistency. Different pressure every shot means you can never tell what changed when you’re dialing in.
- The twist-and-polish. Twisting on the way out can crack the puck surface. Press, then lift straight up.
- Wrong tamper size. A tamper too small for your basket leaves a gap around the edge, and guess where the water escapes? Match the diameter.
The Tools That Make This Foolproof
You can absolutely tamp well with just a good tamper and a steady hand. But a few inexpensive tools take the guesswork out entirely:
- A properly sized tamper. Match it to your basket diameter (commonly 58 mm on full-size machines, but check yours). A flat base is the standard; convex bases exist but are a niche preference.
- A calibrated / spring-loaded tamper. These click at a set pressure (often around 30 lb) so you get the exact same press every time. The real benefit isn’t the magic number, it’s the repeatability.
- A distribution tool / leveler. Spins flat across the grounds to even them out before you tamp. Huge help for clump-prone grinders.
- A tamping mat. A grippy silicone pad that holds the portafilter steady and protects your counter so you can press straight down without it sliding.
- A dosing funnel. A ring that sits on the basket to keep grounds from spilling while you distribute.
None of it replaces good fundamentals, and none of it replaces good coffee. Tamping technique can only do so much if your beans are stale, so keep them fresh in proper airtight storage containers and you’ll taste the difference under every gram of pressure.
Frequently Asked Questions
How hard should I tamp espresso?
Somewhere between about 15 and 30 pounds of force is plenty. Practice pressing on a bathroom scale once to learn the feeling, then aim for the same firm press every time. Once you feel the puck push back with solid resistance, you’re done. Consistency and a level press matter far more than the exact poundage.
Is the 30 lb tamping rule real?
It’s more tradition than science. Coffee compresses only to a lock-out point, after which extra force does almost nothing to the cup. Taste tests between comfortable and very heavy tamps show only a tiny difference. Treat 30 lb as a loose ballpark, not a sacred law, and focus your energy on leveling instead.
Do I really need to distribute before tamping?
Yes, and it’s the step that makes the biggest difference. Tamping only locks the grounds in their current shape, so if they’re clumpy or piled to one side, your puck will be uneven no matter how perfectly you press. Spread and level the grounds first, then tamp.
Why is my espresso channeling even though I tamp hard?
Because hard isn’t the issue, even is. Channeling almost always comes from poor distribution, a tilted tamp, or an inconsistent grind, not from too little pressure. Level your grounds, keep the tamper perfectly flat, and check that your grinder is producing a uniform grind before you blame your arm strength.
Do I need a fancy calibrated tamper?
No, but it can help if you struggle with consistency. A calibrated tamper clicks at a set pressure so every press is identical, which is great for beginners. A plain, well-sized tamper plus a level press works just as well once your technique is dialed in.
That’s the whole secret: distribute flat, press level, repeat. Skip the wrist-destroying heroics and let consistency do the heavy lifting. Now go pull a shot that actually tastes like the coffee you paid for, and maybe pour yourself something nice while you’re at it. You’ve earned it.