A Comprehensive Guide to Brewing Coffee While Camping
Let’s settle something: coffee tastes better outside. Cold morning, woodsmoke in the air, a mug warming your hands while the rest of the campsite is still in their sleeping bags — that first sip hits different, and you know it. The only tragedy is showing up unprepared and rationing sad instant granules like it’s a survival situation. It’s not. You can brew a genuinely great cup at a campsite with almost no gear, and this guide walks you through exactly how — the methods, the ratios, the water temps, and the rookie mistakes that ruin a perfectly good morning. Whether you’re car camping with a full kit or counting every gram in a backpack, you’ll leave knowing precisely what to pack and how to use it.
How to Brew Coffee While Camping (The Short Version)
Here’s the whole thing in one breath: bring good coffee, bring something to heat water, bring one brewing device you actually know how to use, and aim for a ratio of about 1 part coffee to 16 parts water by weight. Everything else is detail — important detail, sure, but that’s the spine of it. The biggest difference between great campsite coffee and bitter sludge isn’t fancy equipment; it’s water temperature and grind size, two things you can absolutely control with the right coffee beans even in the middle of nowhere.
Pro move: pre-measure your coffee at home and store each day's dose in a small sealed bag or tin. No fishing around for a scoop at 6 a.m., no spilling grounds in the dirt, and your beans stay fresher than a half-open bag rattling around your pack. One bag, one brew, done.
Below I’ll break down the gear you actually need (and what you can skip), four brewing methods ranked by effort and packability, a foolproof step-by-step, the mistakes that quietly wreck your cup, and a quick FAQ. If you want a deeper dive on matching method to trip type, our companion guide on the best coffee for camping and outdoor brewing methods is a great next stop. Now let’s get you caffeinated.
What Gear You Actually Need for Campsite Coffee
You do not need to recreate a third-wave café on a picnic table. You need a way to heat water and a way to separate coffee from grounds. That’s it. Here’s the honest packing list, sorted into the essentials and the nice-to-haves so you’re not hauling gear you’ll never touch.
The Essentials
- A heat source: a camp stove or a stable campfire. Stoves are faster and far more controllable, which matters more than you’d think for coffee.
- A pot or kettle for boiling water. A gooseneck-style kettle is a luxury for pour-over, but any pot you can pour from works.
- One brewing device you’ve practiced with at home. Camping is not the time to learn a new method by trial and error.
- Quality coffee, ideally whole bean if you’ve got a grinder, otherwise pre-ground to the right size for your method.
- An insulated mug or flask. Outdoor air steals heat fast — an insulated vessel keeps your cup drinkable past the first three minutes.
The Nice-to-Haves
- A hand grinder. Fresh-ground beans genuinely taste better, and a manual portable coffee grinder is built for exactly this. Worth its weight if you care.
- A small scale (the kind that weighs in grams). Eyeballing works, but a scale is the single fastest way to make your coffee consistent trip to trip.
- A thermometer, or just the off-boil trick I’ll explain below. You don’t strictly need one.
- Filters or a reusable filter if your method calls for them — don’t be the person who packed the dripper and forgot the filters.
If you’re building a kit from scratch and want to understand the trade-offs between brewers, our roundup of the best coffee makers and the deep-dive on innovative coffee gadgets and brewing equipment will save you from buying something you’ll resent carrying.
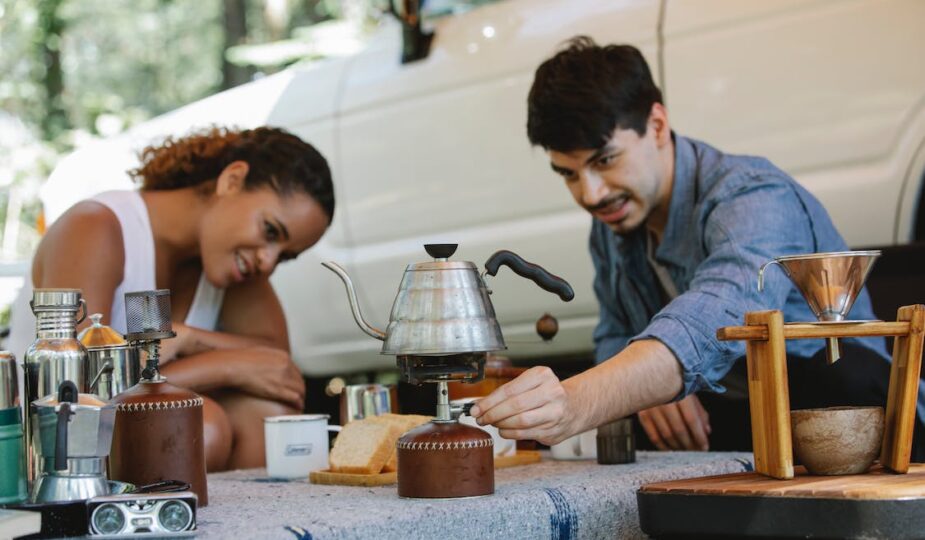
4 Ways to Brew Coffee at a Campsite, Ranked by Effort
There’s no single “right” method — there’s the right method for your trip. A backpacker counting ounces makes different choices than someone with a cooler and a folding table. Here are the four that actually earn their spot in a pack, with the real pros, cons, and ratios for each.
1. French Press — Easiest Full-Bodied Cup
If you want one device that’s nearly foolproof and makes a rich, satisfying cup, this is it. Lightweight travel presses (look for unbreakable plastic or insulated steel) handle the abuse of a pack. Use a coarse grind — think coarse sea salt — and a ratio of about 1:15 (roughly 30 g coffee to 450 ml water for a generous two cups).
- Add coarse grounds to the press.
- Pour in water just off the boil and give it a quick stir.
- Steep for 4 minutes — set a timer, don’t guess.
- Press the plunger down slowly and steadily. If it fights you, your grind’s too fine.
- Pour it all out right away so it doesn’t keep brewing into bitterness.
2. Pour-Over — Cleanest, Most Flavorful Cup
Pour-over gives you a bright, clean cup and packs down to almost nothing — a collapsible dripper and a stack of filters weigh basically zero. The catch: it’s the most hands-on, and it rewards a slow, steady pour. Use a medium grind and a 1:16 ratio (about 25 g coffee to 400 ml water).
- Set the dripper over your mug, drop in a filter, and rinse it with hot water if you can (it kills the papery taste).
- Add grounds, then pour just enough water to wet them. Wait 30 seconds for the “bloom” — that’s the coffee degassing, and it matters.
- Pour the rest slowly in circles, keeping the water level steady. Total brew time: 2.5 to 3.5 minutes.
3. AeroPress — Best for Backpackers
Light, nearly indestructible, easy to clean (the puck pops straight out), and quick — the AeroPress is the backpacker’s darling for good reason. It makes a smooth, low-bitterness, concentrated cup you can drink straight or dilute. Use a medium-fine grind, around 15–17 g of coffee, and brew in about 1.5 minutes. Want the full method down to the second? Our complete AeroPress guide has you covered.
4. Cowboy Coffee / Percolator — Zero Special Gear
No brewer at all? You can still do this. “Cowboy coffee” means brewing grounds loose in a pot — rustic, a little risky, but it works if you’re careful. A stovetop percolator is the slightly more refined cousin and the classic campfire coffee setup. Both need a coarse grind so you’re not chewing your coffee.
- Boil your water, then pull the pot off the heat and let it settle for 30 seconds (boiling water scorches coffee — more on that below).
- Stir in coarse grounds, about 2 tablespoons per 8 oz of water.
- Let it steep 4 minutes, then sprinkle a tiny splash of cold water on top — it helps the grounds sink.
- Pour slowly and stop before you hit the sludge at the bottom.
Step-by-Step: Your Perfect Campsite Cup
This is the master sequence — the part that stays the same no matter which method you chose above. Nail these six steps and you’ll never choke down a bad camp coffee again.
Step 1: Choose the Right Coffee Beans
Start with beans you actually like at home — the outdoors doesn’t magically improve bad coffee. A medium-to-dark roast is the camping sweet spot: it’s forgiving, holds up to slightly imperfect technique, and gives you that bold, comforting cup that pairs with cold mornings. Buy whole beans if you’re bringing a grinder; if not, grab freshly ground and use it within a few days. For help picking, lean on our guide to selecting the perfect coffee beans.
Step 2: Grind to Match Your Method
Grind size is the most underrated lever you’ve got. Too fine for the method and you get bitter, over-extracted mud; too coarse and you get weak, sour water. Quick cheat sheet:
- French press & cowboy/percolator: coarse (sea salt).
- Pour-over: medium (table salt to sand).
- AeroPress: medium-fine.
Grinding fresh at the campsite is ideal, but pre-grinding at home into sealed daily bags is a perfectly respectable shortcut. A manual portable coffee grinder bridges the gap if you want fresh without the bulk.
Step 3: Pack Your Brewing Equipment
Pack for the method you chose and double-check the consumables — filters, an extra fuel canister, your pre-measured coffee. Nest everything inside your pot to save space, and keep one backup option in mind. Coffee bags (steep-in-the-cup pouches, like tea) are a brilliant no-mess fallback that weighs nothing.
Step 4: Heat the Water — and Mind the Temperature
Here’s the secret nobody tells you: don’t brew with boiling water. The ideal range is about 195–205°F (90–96°C) — just below boiling. Pouring a rolling boil straight onto grounds scorches them and turns your cup harsh and bitter. No thermometer? Easy fix: bring the water to a boil, take it off the heat, and count to 30. That short rest drops it right into the zone. At high altitude water boils cooler, so you’ve got even more margin. Keep plastic utensils away from open flame, and never leave a stove unattended.
Step 5: Brew Your Coffee
Follow the method steps from the section above — French press steeps 4 minutes, pour-over runs 2.5 to 3.5 minutes, AeroPress wraps in about 90 seconds, cowboy coffee steeps 4 minutes then settles. Stick to your ratio (1:15 to 1:16 is the safe range), time it, and resist the urge to wander off and forget it. Over-steeped coffee is just bitterness with extra steps.
Step 6: Pour, Sip, and Take the Win
Pour into your insulated mug, wrap both hands around it, and actually stop for a minute. You earned this. The whole reason coffee tastes better outside is that you’re forced to slow down and notice it — so do exactly that before the day gets loud.
Trust me on this one: a tiny pinch of salt in your grounds tames bitterness and rounds out the flavor — a lifesaver for cowboy coffee or a slightly scorched batch. A little goes a long way, so start with barely a pinch and adjust. It's the oldest camp-coffee trick there is, and it works.
Common Camping Coffee Mistakes to Avoid
Most bad camp coffee comes down to a handful of repeat offenders. Dodge these and you’re already ahead of every campsite within a mile.
- Brewing with boiling water. The number one crime. Let it rest 30 seconds off the heat. Non-negotiable.
- Wrong grind for the method. Fine grind in a French press equals gritty, bitter sludge. Match the grind to the brewer.
- Eyeballing wildly. A rough ratio (two tablespoons per cup, or 1:16 by weight) beats “however much looks right” every time.
- Letting it over-steep. Pour the French press out the moment you plunge; don’t let coffee sit on its grounds.
- Storing beans badly. Heat, moisture, and sunlight are the enemy. Keep beans sealed, in the shade, away from your hot stove.
How to Pack and Store Coffee for Camping
Freshness is fragile, and a backpack is a hostile environment for coffee. A few small habits keep every cup tasting like the first:
- Bring whole beans when you can — they hold flavor far longer than pre-ground.
- Use an airtight, crush-proof container so your beans don’t get pulverized at the bottom of your pack.
- Pre-portion each day’s coffee into sealed bags for grab-and-go brewing.
- Store away from moisture, heat, and direct sun — and pack a little extra. Running out on day three is a sad way to camp.
No gear at all and improvising? Our guide on how to make coffee without a coffee maker is the perfect backup plan, and if you want to bring real espresso energy to the trail, the guide to making espresso at home covers portable options worth knowing about.
Frequently Asked Questions
What’s the best way to make coffee while camping?
It depends on your trip. For car camping where weight doesn’t matter, a French press makes the easiest full-bodied cup. For backpacking, the AeroPress wins on weight, durability, and cleanup. Pour-over is the lightest and cleanest-tasting if you don’t mind a slower, hands-on pour. With zero special gear, cowboy coffee or a percolator gets the job done.
How do I make coffee camping without any equipment?
Use the cowboy method: boil water in any pot, pull it off the heat for 30 seconds, stir in roughly two tablespoons of coarse grounds per 8 ounces, steep for four minutes, then add a splash of cold water to settle the grounds before you pour slowly off the top. Pre-bagged steep-in-cup coffee pouches are an even simpler no-gear option.
What temperature should camping coffee water be?
Aim for 195–205°F (90–96°C), just under boiling. Boiling water scorches grounds and makes your cup bitter. The no-thermometer trick: bring water to a boil, remove it from the heat, and count to 30 before pouring. That lands you right in the ideal range.
How much coffee should I use per cup?
A reliable starting point is a 1:16 ratio by weight — about 25 grams of coffee to 400 ml of water — or roughly two tablespoons of grounds per 8 ounces if you’re not weighing. Go a touch stronger (1:15) for French press or a bolder morning cup, and adjust to taste from there.
What kind of coffee is best for camping?
Medium-to-dark roasts are the camping favorite — they’re bold, forgiving of imperfect technique, and pair beautifully with cold mornings. Bring whole beans and a hand grinder if you can; otherwise pre-ground coffee used within a few days works fine. See our guide on selecting the perfect coffee beans for help dialing it in.
Now Go Make a Great Cup Outside
That’s the whole playbook: good beans, the right grind, water just off the boil, a method you trust, and the patience to time it instead of guessing. Do that and you’ll be the most popular person at the campsite, no contest. Pack your kit, find your method, and give the people around you a reason to crawl out of their sleeping bags.
Got a camp-coffee trick of your own — the salt pinch, a cold-brew-overnight hack, a ritual you swear by? Drop it in the comments. We’re always trading notes with fellow outdoor coffee people, and the best tips come from folks who’ve ruined a few cups to get there.
For more ways to brew anywhere, explore the rest of our guides at Ten Coffees:
- How to Vietnamese Coffee: The Strong & Bold Coffee
- How to Hario V60: The Ultimate Guide to Making Perfect Coffee
- How to Siphon Coffee: The Slow and Elegant Way to Brew a Perfect Cup
- How to AeroPress: The Ultimate Guide to Making Amazing Coffee at Home
- How to Turkish Coffee: An Invigorating Coffee Experience