How to Siphon Coffee: The Slow and Elegant Way to Brew a Perfect Cup
Let’s clear something up right now: siphon coffee looks like a chemistry experiment your barista is doing to show off, but it is not hard, and it is not just for show. That gurgling glass contraption makes one of the cleanest, brightest, most tea-like cups you will ever drink at home. Intimidating? A little. Worth it? Absolutely. Stick with me and I will walk you through exactly how to siphon coffee the right way, ratios, grind, temperature, timing, the works, plus the mistakes that quietly ruin most people’s first cup.
Here is what you are getting in this guide: a quick honest take on why siphon (also called vacuum or vac pot) coffee tastes the way it does, the exact gear you need, a foolproof step-by-step recipe with real numbers, the troubleshooting fixes nobody tells you about, and a FAQ for the questions you are absolutely going to have. No fluff. Let’s brew.
Table of Contents
- What Siphon Coffee Actually Is (And Why It Tastes So Clean)
- A Quick History (Because the Backstory Is Genuinely Cool)
- The Equipment You Actually Need
- The Numbers: Ratio, Grind, and Temperature
- The Science Behind Siphon Coffee (The Honest Version)
- How to Make Siphon Coffee: Step by Step
- Common Mistakes (Do This, Not That)
- Tips to Level Up Your Cup
- Frequently Asked Questions
- One Last Pour
What Siphon Coffee Actually Is (And Why It Tastes So Clean)
Siphon coffee is full-immersion brewing with a vapor-pressure twist. You have two glass chambers stacked vertically. Heat the water in the bottom flask, and the building vapor pressure pushes that water up a tube into the top chamber, where it mingles with your grounds. Kill the heat, the bottom chamber cools, a vacuum forms, and gravity plus suction pull the finished coffee back down through a filter. That is the whole trick. It looks like sorcery; it is just physics being dramatic.
Why does it taste so good? Because you get the best of two worlds. The grounds steep fully like a French press (so you get body and a rich aromatic blast), but the brew is then drawn through a filter (so it comes out clean, with none of the gritty sludge). The result is a cup that is bright, syrupy-smooth, and tea-like, with delicate top notes that pour-over and drip tend to flatten. If you love a fruity light-roast single origin, this method shows it off like nothing else.
It is most beloved in Japan, where the siphon ritual is treated like a quiet art form, and you will increasingly spot those gorgeous halogen-lit brew bars in serious specialty shops stateside. But you do not need a five-station setup. You need one siphon, some patience, and the numbers below.
A Quick History (Because the Backstory Is Genuinely Cool)
The vacuum brewer dates back to the 1830s in Germany, with the design popularized by a French woman named Marie Fanny Amelne Massot (Madame Vassieux) in Lyon in the 1840s, and patented in a recognizable twin-chamber form by Scotsman Robert Napier soon after. For a while it was the height of Victorian tabletop theater, then drip and espresso muscled it aside in the West.
Japan is the reason it never died. Japanese coffee culture embraced the siphon for its precision and ceremony, refined the gear (hello, Hario), and quietly kept the craft alive for decades. The global third-wave coffee movement reimported it, which is why your hip local roaster now calls it a “siphon” rather than the old-school “vacuum pot.” Funny how that works. For more on how Japan reshaped home brewing, see our Hario V60 guide.
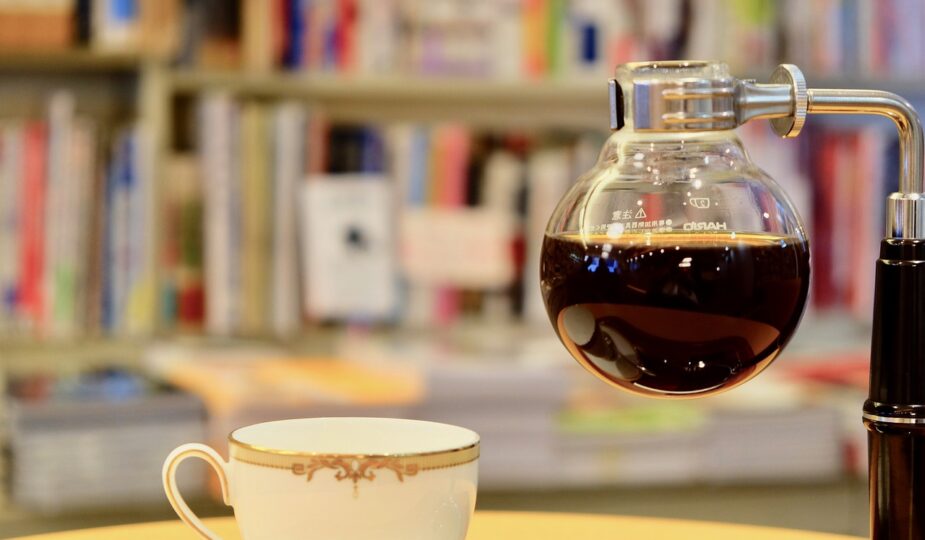
The Equipment You Actually Need
Good news: the gear list is short. You do not need to remortgage the house. Here is the essential equipment for siphon brewing.
- A siphon (vacuum) brewer. Glass is standard and lets you watch the magic. A 3-cup model (about 360 ml) is perfect for one or two people; size up if you brew for a crowd. Popular picks include Hario, Yama, and Bodum, and you can read our take on broader options in the best coffee maker roundup.
- A heat source. Most siphons come with an alcohol burner or butane burner. A halogen beam heater is the splurgy, gorgeous upgrade. A gas or induction stovetop works too if your model is rated for it.
- The right filter. Cloth, paper, or metal. Cloth is the classic and gives the silkiest body, but you must keep it scrupulously clean (more on that below).
- A scale and a timer. Non-negotiable. Eyeballing siphon coffee is how you end up with a sad, muddy cup.
- A burr grinder. Consistent grind size is everything here. Grind fresh, right before you brew.
- Fresh beans and good water. Use fresh, high-quality coffee beans, ideally a bright light or medium roast, and filtered water. Hard, heavily mineralized water mutes flavor and scales up your glass. If you are unsure your beans are up to snuff, here is how to tell good coffee from bad.
The Numbers: Ratio, Grind, and Temperature
This is the part most articles wave their hands at. Not me. Dial these in and you are 90 percent of the way to a great cup.
- Ratio: Start at 1:15, so 20 g of coffee to 300 g of water. Want it lighter and more tea-like, push toward 1:16 or 1:17. Want more body, tighten to 1:14. Weigh it. Do not guess.
- Grind: Medium-fine, somewhere between pour-over and table salt, slightly finer than you would use for drip. This is the single most common thing the internet gets wrong about siphon. Too coarse and your cup is thin and sour; the full-immersion brew can handle a finer grind than you would expect.
- Water temperature: You are brewing in the top chamber at roughly 195 to 205 degrees Fahrenheit (90 to 96 degrees Celsius). The siphon naturally lands in this window once the water has fully migrated up, so you do not have to babysit a thermometer once you understand the rhythm.
- Total brew time: Around 4 to 6 minutes from first heat to final drawdown, with roughly 60 to 90 seconds of actual steeping in the top chamber.
The Science Behind Siphon Coffee (The Honest Version)
Quick myth-bust, because you will see this explained badly all over the place: the water does not “drip back down while it brews.” Here is what truly happens. You heat the bottom flask. As the water warms, vapor pressure builds in that sealed lower chamber and forces the liquid water up the siphon tube into the upper chamber, where it sits and steeps with your grounds. A little water always stays in the bottom, which keeps generating the vapor that holds everything up top.
When you remove the heat, the bottom flask cools and the vapor condenses, dropping the pressure and creating a partial vacuum. That vacuum, with a hand from gravity, sucks the brewed coffee back down through the filter, leaving the spent grounds behind. The combination of full immersion plus a clean filtered draw is exactly why the cup is both flavorful and crystal clear. Physics, not magic, but it sure looks like magic.
How to Make Siphon Coffee: Step by Step
Here is the foolproof recipe. Read it once all the way through before you start, then go.
- Prep the filter. If you use a cloth filter, rinse it well first. Seat the filter in the top chamber and clip its little chain over the bottom of the glass tube so it sits centered. A crooked filter equals a leaky, sad brew.
- Add hot water to the bottom flask. Pre-heating with already-hot (near-boiling) filtered water saves a lot of time and avoids over-roasting your glass. Pour in your target water weight, for example 300 g.
- Fire up the heat. Set the bottom flask over your burner. As the water heats, vapor pressure will push it up into the top chamber. Let almost all of it migrate up, leaving just a thin layer in the bottom.
- Add the grounds. Once the water is up top and sitting around 195 to 205 F, add your 20 g of medium-fine coffee. Start your timer now.
- Stir to saturate, gently. Use a bamboo paddle or spoon and give a soft back-and-forth stir, just enough to wet every ground and break the dry clumps. Do not whip it. You are saturating, not beating eggs.
- Let it steep. Hold the steep for about 60 to 90 seconds. At the 30-second mark, give the floating crust one more gentle stir to keep extraction even.
- Cut the heat and stir once more. Remove the burner completely. Give a final light stir as the brew starts to fall. This helps the coffee draw down cleanly and evenly.
- Watch the drawdown. The vacuum pulls the coffee back into the bottom flask through the filter, leaving a domed, level bed of spent grounds on top. A flat, even dome is the sign of a balanced extraction. Total time should land in that 4 to 6 minute window.
- Detach and serve. Carefully remove the top chamber (use the stand or lay it in the lid cradle), pour, and drink it reasonably soon. Siphon coffee is at its glorious best while it is hot and aromatic.
Common Mistakes (Do This, Not That)
I want you to nail this on the first try, so let’s head off the usual disasters.
- Grinding too coarse. The number one rookie error. Coarse grind plus full immersion equals weak, sour coffee. Go medium-fine and adjust from there.
- Skipping the scale. “About a scoop” is not a recipe. Weigh coffee and water every single time until your hands know the feel.
- Over-stirring. Aggressive stirring strips bitter compounds and clogs the filter. Gentle paddling only.
- Leaving it on the heat too long. If you let it cook up top for three-plus minutes, you bake out the bright notes and the cup turns flat and ashy. Watch the clock.
- A dirty or dry cloth filter. Stale coffee oils in the cloth taint every future brew. Store a used cloth filter submerged in clean water in the fridge, and replace it when it looks tired.
- Pouring grounds in before the water is up top. Add coffee only after the water has migrated, or you will get uneven, channelly extraction.
Tips to Level Up Your Cup
Once the basics are second nature, this is how you go from good to genuinely showstopping.
- Choose a bright, fruit-forward light or medium roast single origin, an Ethiopian or Kenyan is a stunner here.
- Grind fresh, right before brewing, and keep your coffee grounds consistent with a quality burr grinder.
- Taste and adjust like a scientist: too sour means grind finer or steep a touch longer; too bitter means grind coarser or shorten the steep.
- Use soft, filtered water with moderate mineral content for the cleanest flavor and less scaling.
- Pre-warm your serving cups so the coffee stays hot in this temperature-sensitive method.
- Tracking your caffeine dose? A standard 1:15 siphon cup lands in the same ballpark as other brewed coffee, roughly 95 mg per 8-ounce serving depending on your beans.
Frequently Asked Questions
What grind size should I use for siphon coffee?
Medium-fine, slightly finer than drip and a notch coarser than espresso, think somewhere between pour-over and table salt. Because siphon is a full-immersion method drawn through a filter, it handles a finer grind well, which boosts extraction and clarity. If your cup tastes thin or sour, your grind is almost certainly too coarse.
What is the best coffee-to-water ratio for a siphon?
Start at 1:15, for example 20 grams of coffee to 300 grams of water, and adjust to taste. Move toward 1:16 or 1:17 for a lighter, more tea-like cup, or tighten to 1:14 for more body. Always weigh both the coffee and the water rather than guessing by volume.
How long does siphon coffee take to brew?
About 4 to 6 minutes total from first heat to final drawdown, including roughly 60 to 90 seconds of active steeping in the top chamber. The water migrates up, you add grounds and stir, it steeps, you cut the heat, and the vacuum pulls it back down. It is slower than drip but faster than you would think for something this theatrical.
How is siphon different from pour-over or French press?
French press is full immersion with no paper filter, so it is rich but a little muddy. Pour-over is a clean filtered brew but no immersion, so it is crisp but can lose body. Siphon does both at once: full immersion for flavor and body, plus a filter for a clean finish. That combination is why the cup is uniquely bright, smooth, and aromatic.
Is siphon coffee worth the effort?
If you love the ritual and want to taste the delicate top notes of a great single origin, completely. It is more hands-on and the glassware is more fragile and pricier than a drip machine, so it is not your bleary-eyed Monday-morning autopilot brewer. But as a weekend treat or a showpiece for guests, it earns every minute. Try it once and you will get why people fall hard for it.
One Last Pour
Siphon coffee is equal parts science experiment and slow-morning ritual, and that is exactly the charm. Get the grind medium-fine, weigh your 1:15, keep your stirs gentle, mind the clock, and you will pull a cup that is clean, bright, and quietly spectacular, the kind of cup that makes a regular Tuesday feel like an occasion. Now go set up that glassware, fire the burner, and brew yourself something beautiful. You have got this.