Maintaining Your Coffee Grinder: A Guide to Cleaning and Care
Here is the uncomfortable truth nobody selling you a fancy burr grinder mentions: that gorgeous machine is slowly sabotaging your coffee, one stale ground at a time. Coffee beans are oily little things, and every time you grind, you leave a film of those oils and fine “dust” behind. Within a couple of weeks it turns rancid, and suddenly your bright, expensive, single-origin beans taste like a cardboard box that lost a fight with a stale almond. Not your beans’ fault. Not your barista skills. It is the gunk.
Good news: cleaning your grinder is genuinely easy, takes about ten minutes, and is the single cheapest upgrade you can give your morning cup. This is your complete guide to caring for your coffee grinder the right way. You will get the exact tools, a step-by-step process for both burr and blade grinders, how often to actually do it, the mistakes that quietly wreck grinders, and answers to the questions everyone is too embarrassed to ask. Let’s get into it.
Why a Clean Grinder Makes Better Coffee
Here is the part that turns “ugh, a chore” into “oh, THAT’S why.” Three things happen inside a neglected grinder, and all three end up in your cup.
- Rancid oils. Coffee’s natural oils go rancid through oxidation, just like an open bottle of cooking oil left on the counter. Old oil coating fresh grounds means muddy, bitter, sometimes sour flavors layered over whatever you actually brewed.
- Stale retention. Every grinder holds onto a little ground coffee in its chamber and chute, that is normal. Let it pile up and your “fresh” grind is part fresh, part fossil. You are tasting last month’s beans.
- Inconsistent grind. Caked-on fines and oil gum up the burrs, so they cannot grind cleanly. You get an uneven mix of boulders and powder, which is the express lane to a brew that is bitter and weak at the same time (yes, both, it is a special kind of sad).
If your coffee has started tasting flat or unexpectedly harsh and your beans are fresh, do not buy new beans yet. Look at your grinder first. Nine times out of ten, the grinder is the culprit, and the fix is free.
The Tools You’ll Need
Before we dive in, gather your supplies. You almost certainly own most of this already, no special shopping trip required:
- A soft brush or clean toothbrush — your main tool for knocking loose grounds out of tight spots. A cheap paint brush or a dedicated grinder brush works too.
- A dry microfiber cloth — for wiping surfaces and the hopper.
- Grinder cleaning tablets (like Grindz) or plain uncooked rice — to absorb oils and scrub the burrs from the inside.
- A vacuum or compressed air — optional but fantastic for pulling fines out of the burr chamber.
- Mild dish soap and warm water — only for parts the manufacturer says are washable.
- Cotton swabs and a wooden or plastic toothpick — for digging crud out of corners without scratching anything.
One firm rule before we start: keep water far away from the motor and any electrical bits. Burrs and removable hoppers can sometimes get wet (check your manual), but the body of the machine stays dry. Always.
Coffee grinders have an ancient history, with the earliest evidence tracing back to 15th-century Yemen, where beans were crushed using mortar and pestle. In the 17th century, mechanical grinders debuted, revolutionizing the process. Now, an array of grinder types and styles exist, all pivotal in crafting the ideal cup of coffee.
First, Know Your Grinder: Burr vs. Blade
You cannot clean a thing properly if you do not know how it is built, so let’s settle this fast. The cleaning routine differs a little depending on which type you own, and if you are still shopping, our guide to choosing the right coffee grinder walks through the options.
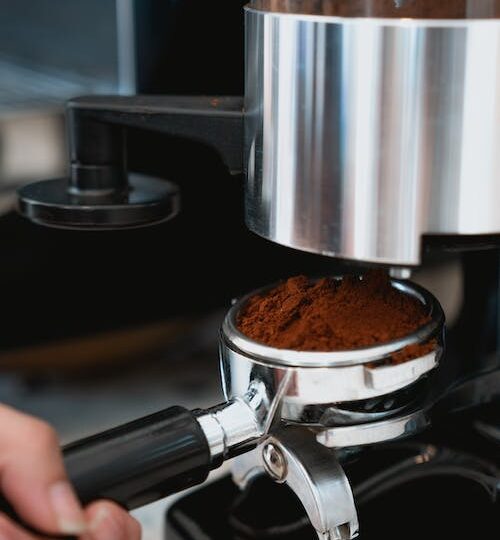
Burr grinders
Two abrasive surfaces (burrs) crush beans to a uniform size. They come as flat burrs or conical burrs, and most have a removable upper burr you can pop out for cleaning. These are the grinders coffee people obsess over because they produce a consistent grind, and consistency is everything for good extraction. They also have more nooks for oils to hide, so they need a touch more attention.
Blade grinders
One spinning blade chops beans like a tiny propeller. Cheaper, simpler, and they produce an uneven grind (some powder, some chunks), but they are wonderfully easy to clean because there is just one chamber and a blade. If you own one, you will mostly be wiping and brushing rather than disassembling.
How to Clean a Burr Coffee Grinder, Step by Step
This is the main event. Here is how you deep-clean a burr coffee grinder from top to bottom. Read the whole thing once before you start so nothing surprises you mid-disassembly.
- Unplug it and empty the hopper. Safety first, always. Pour any beans back into their airtight container so they do not get lost in the chaos.
- Run the grinder empty for a few seconds. This clears out most of the loose grounds sitting in the burrs and chute, so you are starting from a cleaner baseline. Then unplug again.
- Remove the hopper and wipe it down. The hopper collects an oily, sticky film over time. Wipe it with a dry cloth; if your manual says it is washable, use warm water and a drop of mild dish soap, then dry it completely before it goes back on.
- Take out the upper burr. Most consumer grinders have a removable top burr that twists or unlatches. Check your manual for the exact move, do not force anything. Note how it sits so reassembly is painless.
- Brush both burrs thoroughly. Use your brush to sweep grounds and oil out of the upper burr and the lower (fixed) burr seated in the machine. Get into the grooves, that is where the fines hide. A toothpick helps lift stubborn packed coffee out of the teeth.
- Clear the chute. The exit chute clogs with damp, caked grounds, especially the bottom of it. Brush it out, and a cotton swab is perfect for the corners. A quick vacuum here does wonders.
- Tackle oil buildup with rice or tablets. If the burrs feel tacky or look glazed, run a tablespoon of grinder cleaning tablets or plain uncooked rice through on a medium setting. It is mildly abrasive and oil-absorbing, scrubbing the burrs from the inside as it grinds. Important: check your manual first, some manufacturers warn against rice because it is harder than coffee. When in doubt, use purpose-made tablets.
- Purge with a few coffee beans. After rice or tablets, grind a small handful of cheap coffee beans and throw those grounds away. This clears any leftover rice dust or tablet residue so it does not end up in your next cup.
- Wipe the exterior. Damp (not wet) cloth over the body, buttons, and dials. Dry cloth to finish. Skip abrasive cleaners, they dull the finish.
- Reassemble and double-check it is dry. Put the burr and hopper back exactly as they came out, make sure everything seats and locks, and confirm every part is bone dry. Moisture inside a grinder leads to clumping and, eventually, rust on the burrs.
That is it. From dingy to delicious in about ten minutes. The first time feels fiddly; by the third time you will do it on autopilot while the kettle heats.
How to Clean a Blade Grinder
Blade grinder owners, this is your shorter, easier path. No disassembly, no drama.
- Unplug it. Non-negotiable, blades are sharp and motors are unforgiving.
- Brush out loose grounds. Tip it over a trash can and brush the chamber and blade clean.
- Grind a couple tablespoons of uncooked rice. The rice absorbs oils and scours away residue. Grind until it is a fine powder, then dump it.
- Wipe the chamber. A cloth lightly dampened with warm soapy water, working around the blade carefully, then a dry pass to finish. Never submerge a blade grinder, the motor lives right underneath.
- Let it air dry fully before the lid goes back on.
How Often Should You Clean Your Grinder?
Two answers, because there are two kinds of cleaning, and people constantly conflate them.
- Quick wipe and brush: weekly, or after every couple of pounds of beans. Thirty seconds of brushing the chute and wiping the hopper keeps oils from ever building up. This is the habit that actually matters.
- Full deep clean (burr removal, tablets): every 2 to 4 weeks for daily drinkers, or every 30 to 40 pounds of beans. Heavy espresso users with oily dark roasts should lean toward the more frequent end, because dark, shiny beans gunk up burrs faster.
Speaking of oily beans: if your beans look glossy and slick, they are coating your burrs with extra oil and you will need to clean more often. Lighter roasts are drier and far kinder to your grinder. If you want to understand why beans behave so differently in the first place, here is why coffee beans taste different from one another.
Common Grinder Mistakes to Avoid
I have seen people destroy perfectly good grinders doing things they swore were “fine.” Do not be that person. Here is the do-this-not-that list.
- Do not run water through the motor or wet the electrical parts. This is the fastest way to kill a grinder. Dry-clean the body, period.
- Do not grind ice to “clean” it. Tempting because it is cheap, but ice is brutally hard and adds moisture, a double threat to your burrs. Here is the full breakdown on why ice in a coffee grinder is a bad idea, plus what to use instead.
- Do not soak burrs unless the manual approves it. Many burrs are coated steel that can rust or lose their coating in water. When wet cleaning is allowed, dry them immediately and completely.
- Do not store beans in the hopper long-term. Light, heat, and air go to work on them, and the oils they shed coat your hopper and burrs. Keep beans in an airtight container and only fill the hopper with what you will use soon.
- Do not skip the bean purge after using rice or tablets. Leftover residue in your first cup is gritty and weird. Grind and toss a few beans first.
- Do not force a stuck burr. If it will not come out, check the manual or a video for your specific model. Cranking on it can crack the housing.
By following these cleaning and maintenance practices, you'll not only enhance the flavor of your coffee but also prolong the lifespan of your grinder. Remember, a well-maintained coffee grinder is the secret to a consistently delicious cup of coffee.
Maintenance Tips for a Longer Grinder Lifespan
Cleaning handles the gunk. These habits handle everything else, and together they can add years to a good grinder.
- Grind only what you need for each brew. Overloading strains the motor and leaves more retained grounds to go stale.
- Store beans properly: airtight container, away from sunlight, heat, and moisture. Fresh, dry beans are easier on burrs and taste better, win-win.
- Watch your burrs for wear. Burrs are consumable. After roughly 500 to 1,000 pounds of coffee (a lot, but it happens for daily drinkers over years), they dull and grind less evenly. Most quality grinders sell replacement burrs, far cheaper than a whole new machine.
- Listen to your grinder. New rattles, grinding, or a labored motor sound usually mean a stray pebble, a jammed bean, or a part that needs reseating. Catch it early.
- Keep it on a stable, dry surface away from the steam of your kettle or espresso machine. Ambient moisture is the slow enemy.
A clean, well-kept grinder is the quiet workhorse behind every great cup, and it pairs with the rest of your setup. If you are dialing in the whole lineup, see which coffee maker makes the best tasting coffee, and if you are curious what other tools deserve a spot on your counter, browse our roundup of innovative brewing equipment. A grinder that throws stray grounds into your cup is also a common cause of sediment, our guide to preventing grounds in your coffee covers the rest.
Frequently Asked Questions
Can I wash my grinder burrs with water?
Sometimes, but only if your manufacturer says so. Many burrs are coated steel that can rust or degrade when wet. If washing is allowed, use warm water with a tiny bit of mild soap, scrub gently with a soft brush, rinse, and then dry them completely and immediately before reassembling. When you are unsure, stick to dry brushing and cleaning tablets, you will get a clean burr without the risk.
Is it safe to grind rice to clean my grinder?
Plain uncooked rice works as a cheap oil-absorbing scrub and is fine for many grinders, but rice is harder than coffee beans, so some manufacturers specifically warn against it to protect the burrs and motor. Purpose-made cleaning tablets like Grindz are formulated to be gentler and are the safer bet for pricier burr grinders. Either way, always check your manual and purge a few coffee beans afterward.
How often should I deep-clean my grinder?
For a daily coffee drinker, do a full deep clean (burrs out, tablets or rice, the works) every two to four weeks, or every 30 to 40 pounds of beans. In between, give it a quick brush and wipe weekly. If you grind oily dark roasts or pull espresso every day, clean more often, because those beans coat the burrs faster.
Why does my coffee taste bad even with fresh beans?
A dirty grinder is the usual suspect. Rancid oils and stale retained grounds from earlier batches mix into your fresh grind and drag down the flavor, often tasting flat, bitter, or oddly sour. Before you blame your beans or your brewing, give the grinder a thorough clean. It fixes this far more often than people expect.
When do I need to replace my grinder burrs?
Burrs are consumable parts that dull over time, roughly after 500 to 1,000 pounds of coffee for steel burrs, which is years for most home users. Signs they are worn: a noticeably less consistent grind, more fines and dust, a grinder that runs hotter or louder, or coffee that tastes off even after a deep clean. Most quality grinders sell replacement burrs, which is much cheaper than replacing the whole machine.
The Bottom Line
Your grinder does the hardest, most flavor-critical job on your counter, and it asks for almost nothing in return. Give it a quick brush every week, a proper deep clean every few weeks, keep water away from the motor, and store your beans like you mean it. Do that, and the difference in your cup is immediate and a little ridiculous, the kind of bright, clean flavor you were paying for all along.
Now go give that grinder some love, and treat yourself to a cup that finally tastes like the beans deserve. Got a maintenance trick of your own? Drop it in the comments, we always want to hear it.