From Beans to Brew: A Focus on Coffee Roasting with Hottop
Here’s the thing nobody tells you when you fall down the home-roasting rabbit hole: the machine matters less than you think, right up until it matters more than anything. And the Hottop is the machine that finally makes you stop apologizing for your coffee. It’s a real drum roaster with real controls, sized for a kitchen counter instead of a warehouse, and once you learn its rhythm it’ll roast you a better cup than most cafes in town.
This guide is everything you actually need to roast great coffee on a Hottop, the popular KN-8828B-2K+ in particular: how the machine works, a step-by-step roast you can repeat, real temperatures and times, how to read first and second crack, how to tame the smoke (yes, including that afterburner everyone asks about), and the rookie mistakes that scorch a batch. No fluff, no “elixir,” just the stuff that gets you to a clean, sweet, repeatable roast. Grab a glass of something cold. Let’s roast.
Table of Contents
- Why the Hottop Is Worth It (and Who It’s For)
- Before You Roast: Beans, Setup, and What to Expect
- A Step-by-Step Hottop Roast (With Real Numbers)
- How to Read First and Second Crack Like a Pro
- Taming Smoke: The Afterburner, Explained
- Common Mistakes (Do This, Not That)
- Resting, Storing, and Brewing Your Roast
- Frequently Asked Questions
- The Last Sip
Why the Hottop Is Worth It (and Who It’s For)
A Hottop is a small-batch drum roaster. The beans tumble inside a rotating metal drum over an electric heating element while a fan pulls air through, so they roast evenly instead of scorching on one side the way they do in a popcorn-popper setup. You get convective heat (hot air) and conductive heat (the hot drum) at once, which is exactly how the big commercial roasters do it, just scaled down to about 250 grams a batch.
This is the roaster for you if you’ve outgrown stovetop and air-popper roasting and you want control and repeatability. If you’ve ever nailed a gorgeous roast and then been unable to do it again, this machine is the fix. It’s not the cheapest way in the door, but it’s the one you stop upgrading away from.
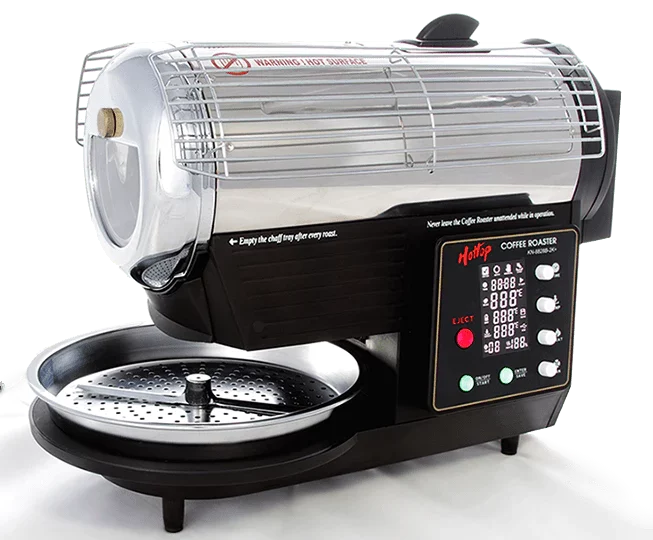
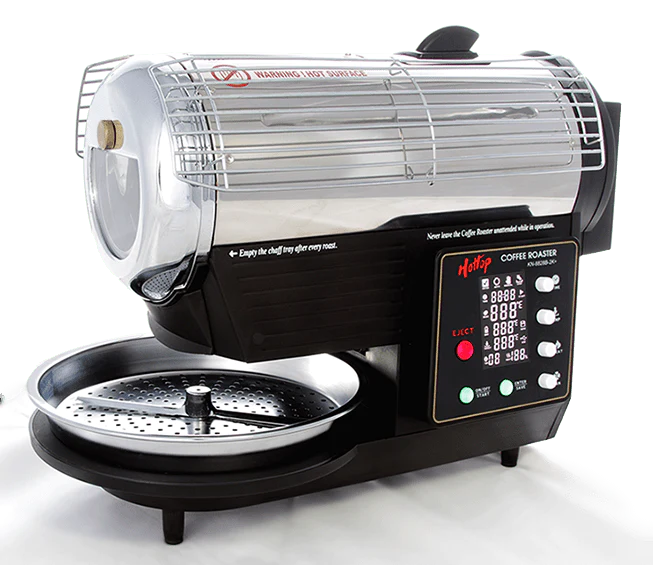
Understanding the KN-8828B-2K+ Model
The KN-8828B-2K+ is the flagship, and it earns the alphabet soup of a name. Here’s what actually sets it apart:
- Real control over heat, airflow, and drum speed. You adjust power and fan on the fly mid-roast, which means you control the way temperature and time shape flavor instead of just hoping for the best.
- Programmable profiles. Save a roast you love and run it again next week, beat for beat. This is the feature that turns “lucky batch” into “house roast.”
- Computer/manual modes. Let it run an automatic profile while you learn, then switch to full manual once you’ve got the feel.
- An afterburner option (the “2K+” part). This is the upgrade that scrubs the smoke before it hits your kitchen. More on that below, because it’s the thing most people get wrong.
- Fast cooling tray. Built-in cooling that crashes the bean temperature the second the roast ends, which protects all that flavor you just developed.
Before You Roast: Beans, Setup, and What to Expect
Great roasted coffee starts before you flip a single switch. You can’t roast flavor into a bean that doesn’t have it, so this part is non-negotiable.
Start with quality green beans
Buy fresh, single-origin green coffee from a supplier who tells you the origin, process, and crop year. Older green coffee roasts unevenly and tastes flat, and moisture content matters more than beginners realize, which is exactly why green bean moisture content is a big deal. If you’re new to buying green, our guide to selecting green coffee beans walks you through it, and it pairs with the basics of choosing the right coffee beans overall. A washed Central American or an Ethiopian is a forgiving, delicious place to start.
Set up smart
- Weigh your charge. A 250g batch is the sweet spot for even roasting on this drum. Overloading it chokes airflow and gives you uneven, baked-tasting beans.
- Ventilate. Even with the afterburner, roast near a range hood or a cracked window. Coffee smoke is real, especially past first crack.
- Have your landing pad ready. A colander or a second cooling tray, a timer or roast-logging app, and a notebook. You will want notes. Trust me.
A Step-by-Step Hottop Roast (With Real Numbers)
Here’s a clean medium roast you can actually repeat. Think of these temperatures as your machine’s bean-probe readings, not laboratory absolutes, and adjust to your specific unit, your beans, and your altitude.
- Preheat. Bring the drum up to a charge temperature around 180–200°C (about 360–390°F). Charging into a cold drum gives you a sluggish, uneven roast.
- Charge the beans. Drop in your 250g. The temperature reading will plunge, then bottom out and start climbing. That bottom point is your “turning point,” usually around 60–90 seconds in. Note it.
- The drying phase. For the first few minutes the beans shed moisture and turn from green to yellow, smelling like grass then bread. Keep heat moderate and steady. Don’t rush this; rushing scorches the outside before the inside is ready.
- The Maillard phase. As the beans pass yellow into tan and light brown, the aroma turns toasty and sweet. This is where body and sweetness are built. Ease back the power slightly so the roast doesn’t run away from you.
- First crack. Around 196–205°C (385–400°F) you’ll hear a sharp, popcorn-like crackle. This is the big one. The beans expand, the chaff flies, and you’ve officially got drinkable coffee. Light roasts end shortly after first crack starts.
- Development time. The stretch after first crack is where roast level lives. Aim for roughly 15–25% of total roast time spent in development. End early (around 30–60 seconds after first crack settles) for a bright medium; let it ride longer toward second crack for a deeper, rounder cup.
- Second crack (optional). Around 224–230°C (435–445°F) you get a quieter, snappier crackle. This is the gateway to dark roasts. Push much past it and you’re in oily, smoky French roast territory, which is delicious on purpose but unforgiving if you wander there by accident.
- Drop and cool. Hit the cool cycle the instant you’re at your target. The Hottop dumps the beans into the cooling tray and runs the fan. Get them to room temperature within about 3–4 minutes. Slow cooling keeps roasting the beans from the inside and muddies everything you just built.
A typical full roast runs 10–14 minutes start to drop. Faster than 9 and you risk underdeveloped, grassy, sour coffee; much slower than 16 and you “bake” the beans into something flat and papery.
How to Read First and Second Crack Like a Pro
Your ears and eyes are better instruments than the display once you trust them. Watch the color march green to yellow to tan to brown, and watch the surface: matte and dry is lighter, the first sheen of oil means you’re heading dark.
- First crack = audible popcorn pops. Sharp and loud. The start of all proper roasts.
- The lull between cracks. Quiet stretch. This is your decision window. Drop here for medium.
- Second crack = a faster, finer Rice-Krispies snap. Quieter and quicker. You’re now in dark-roast land, and the smoke ramps up fast.
Different roast levels taste genuinely different, and if the light-medium-dark thing is still fuzzy, our overview of light, medium, and dark roasts is the perfect companion read. The short version: lighter roasts keep more origin character and acidity, darker roasts trade that for body and bittersweet, roasty notes, which is a big reason coffee beans taste so different from one another.
Taming Smoke: The Afterburner, Explained
Let’s settle the most-asked question. Home roasting makes smoke, period, and the more you head toward dark roasts, the more there is. The KN-8828B-2K+’s afterburner heats the exhaust hot enough to burn off the smoke particles and a chunk of the odor before they leave the machine. It genuinely cuts the haze and the “what are you cooking?!” texts from your housemates.
But hear me clearly: an afterburner is a smoke reducer, not a smoke eliminator. It is not a substitute for ventilation. Roast near your range hood or an open window anyway. Use both and your kitchen stays livable even on a dark roast day. Skip the ventilation and lean on the afterburner alone, and you’ll set off the smoke detector eventually. Don’t argue with me on this one.
Common Mistakes (Do This, Not That)
- Don’t overload the drum. Stick near 250g. Cramming in more chokes airflow and bakes the batch. Less is more, and your cup will thank you.
- Don’t charge into a cold or screaming-hot drum. Preheat to a sane charge temp and let the turning point do its job.
- Don’t chase second crack on every roast. Most beans shine in the window right after first crack. Tearing past second crack is how you accidentally torch a delicate Ethiopian into ashtray coffee.
- Don’t drink it the same day. Fresh-roasted beans are still off-gassing CO2. Let them rest 12–48 hours (24 is a safe default; some beans peak at 3–5 days). Brew too fresh and the gas fights your extraction.
- Don’t cool slowly. Get them to room temp fast or they keep roasting in the tray.
- Don’t ignore your logs. Write down charge temp, turning point, first-crack time, drop temp, and total time. That notebook is how “I got lucky” becomes “I have a house roast.”
Nail these and you sidestep most of the off-flavors people blame on their beans. A lot of what tastes harsh in a cup traces back to the roast, which is worth keeping in mind when you’re troubleshooting bitter coffee later.
Resting, Storing, and Brewing Your Roast
After the rest, store beans in an airtight container away from light, heat, and moisture, and grind right before you brew. Whole beans hold their flavor for a couple of weeks; ground coffee starts fading in minutes. Then match your roast to your method: a bright medium sings through a pour-over, a darker roast holds up in an espresso or a moka pot. If you’re dialing in the cup, our notes on adjusting coffee strength for the perfect flavor and making the best coffee at home close the loop from green bean to mug. And if you’re still deciding on gear, here’s which coffee maker makes the best-tasting coffee.
Frequently Asked Questions
How long does a roast take on a Hottop?
Most batches run 10–14 minutes from charge to drop, depending on roast level and starting temperature. Going much faster than 9 minutes tends to leave coffee grassy and underdeveloped; dragging past 16 “bakes” it flat. A 250g batch in this range is your reliable middle ground.
How much coffee can the KN-8828B-2K+ roast per batch?
About 250 grams of green coffee per batch, which yields roughly 200–215 grams roasted after moisture loss. That’s enough for several days of brewing for one or two people. Resist the urge to overfill; a properly sized charge roasts far more evenly.
Does the afterburner remove all the smoke and odor?
No, and don’t expect it to. The afterburner significantly reduces smoke and odor by burning off exhaust particles, but it’s a reducer, not an eliminator. Always pair it with real ventilation, like a range hood or open window, especially when you roast darker.
How long should I rest beans before brewing?
Rest freshly roasted beans at least 12–48 hours so they can off-gas CO2. Twenty-four hours is a safe default; many beans peak around 3–5 days and stay great for a couple of weeks. Brewing same-day usually tastes gassy and thin.
Where do I buy green beans for home roasting?
Reputable online green-coffee suppliers, specialty roasters who sell unroasted bags, coffee importers, and green-bean subscription services are all solid options. Look for stated origin, process, and crop year, and start with fresh, current-crop coffee. Our guide to selecting green coffee beans covers what to look for.
The Last Sip
Roasting on a Hottop isn’t some mysterious art reserved for people in aprons with clipboards. It’s a drum, some heat, a little airflow, and your own two ears listening for that first crack. Start with good green coffee, keep your batches sane, log every roast, and let the beans rest before you pour. Do that and you’ll be drinking coffee you roasted yourself, dialed exactly to your taste, fresher than anything on a shelf.
Now go fire up that roaster and make somebody a cup worth bragging about.